KEEPING YOUR VESSEL SHIPSHAPE Part 3
Bi-annual maintenance tips
[Originally published in the September 2023 issue of Ski-Boat magazine]
By Craig Stubbs
IN the first two parts of this series we focused on critical post-trip maintenance, ideally to be carried out after every launch, and then moved on to some quarterly maintenance, focusing on your boat’s superstructure and motors. In this final part, we are going to take a look at maintenance that should be carried out every six months to a year, depending on how often you are launching.
This is mainly focused around the actual structure of your vessel and its integrity. If you don’t look after this stuff you can be in for some big bills, but if you catch it early you’ll be amazed how much you can save yourself with a bit of DIY.
The biggest wear points on your vessel are undoubtedly your hull and keel strips which take the brunt of the grind when your boat slides up the sand while beaching. Picture this process as an aggressive bout of sandpapering each time you beach, and you will soon understand the toll it takes on your hull.
On the topic of beaching, I am amazed at how unnecessarily hard some people beach. Sure, on a full high tide or when there is a large shore break, it’s definitely necessary to beach at sufficient speed to get your craft well above the high water mark, but on lower tides and on more gently sloping beaches, take it easy and beach sensibly. There are no prizes to see who can get furthest up the beach, and the repeated impact of hard beaching is definitely going to take its toll on your vessel.
KEEL STRIPS KEEP IT TOGETHER
Right, back to the hull and keel strips. First let’s talk about keel strips. If you are surf launching your vessel these are absolutely mandatory, and if you are trailer launching, they are highly recommended. These stainless steel strips will save a lot of impact on your hull.
In terms of maintenance, you need to take a look at how well your keel strips are secured, and then take a look at the screw heads themselves.
When keel strips are fitted, they are normally bonded in place with a product such as Sikaflex or an epoxy, and are then drilled and secured to your hull with stainless steel screws. Over time, cracks and separation can develop in these areas, and this is where a lot of boats get water ingress into the hull. A thorough visual inspection will indicate any visual wear along the keel strip itself as well as where it meets the hull.
Pay special attention to each screw and screw head. Take a screwdriver to each screw, and if it is loose or free spinning, then the screw has lost its grip and needs attention. You have two options here. First remove the existing screw and try a screw of a slightly larger diameter and see if it bites. If that doesn’t work, use a dowel plug and epoxy resin to reseal the hole and then, once the epoxy has hardened, redrill and refit the screw.
Most hardware stores stock epoxy and dowel plugs of varying diameters, and this is something you can easily do at home without much technical know how. Mix your epoxy and try to get a decent amount into the hole. Next, coat the dowel plug with epoxy and then gently hammer it into place before sealing with a little more epoxy. The keel strip itself will stop you hammering the plug all the way into the hole, so simply grab another dowel plug and use this one to seat the other properly until it sits flush.
When you are inspecting the screws, check the screw heads. These often wear to a point that a screw driver begins slipping due to a lack of head pattern, rendering them useless. If this happens and you ever need to replace your entire keel strip, then either you or your local boat shop is going to be facing an uphill battle of trying to drill out stainless screws, and that is no easy feat.
If the screw heads are worn, get them out while you can, and replace them. Every boat owner should have a good stock of right size keel screws in their garage.
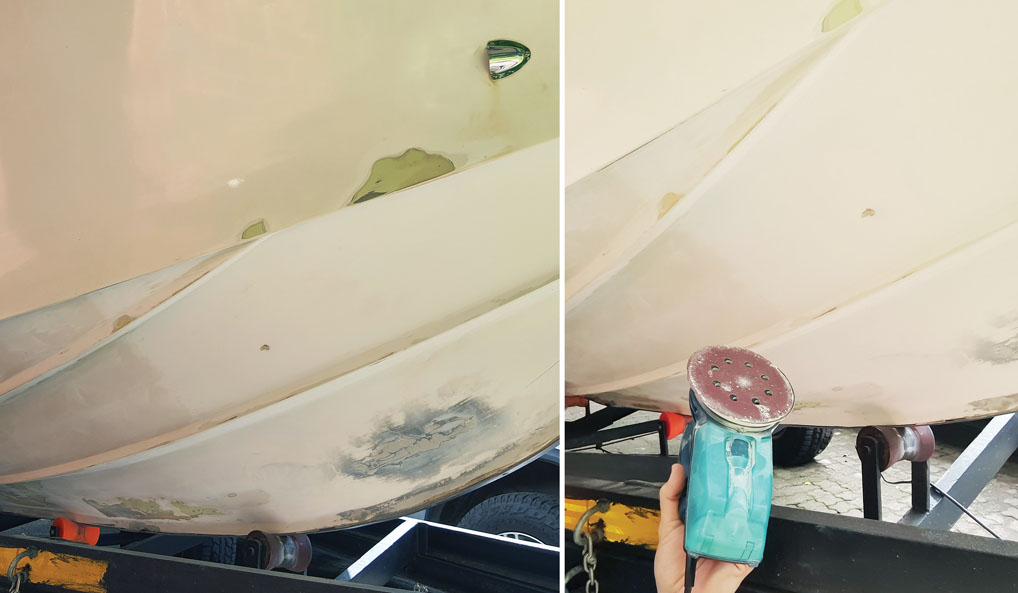
DON’T NEGLECT HULL DAMAGE
While you have been inspecting your keel strip, you may well have noticed some damage and wear to your hull. Don’t leave this for another few months!
While the damage caused from wear is minimal, it can still easily be repaired at home, but when your fibreglass wears through too deeply, then it needs to be repaired from inside the hull. This means cutting open your deck and removing the flotation in order to access the portion of the hull that needs attention. There are times where this is the only way to go, but often, if you catch the wear early enough, it’s dead simple – albeit a little messy – to sort out at home.
If the wear extends past the first layer or two of fibreglass then you need to replace with some fresh fibreglass. You will need some fibreglass matting, epoxy resin and a few basic and inexpensive fibreglassing tools. There are dozens of Youtube tutorials that explain how to do patch work with fibreglass, so I won’t bore you with details, but my best advice is to avoid rushing this job. Prepare the area well, make sure you get your epoxy mix right so your cure is as good as possible, and work in layers rather than big patches.
If the wear is minimal and does not affect the boat’s structural integrity, then a great product to use is Sikadur AP (available at most Builders Warehouse outlets). This is a two-part all-purpose paste adhesive that, when mixed, forms a paste equivalent in texture to thick peanut better. You can use a spatula to spread the paste over wear patches and minor scratches and, once dried, it can easily be sanded to a lovely finish. It really does make minor repairs a breeze. Apply, level out, dry and sand. No mess, no fuss.
REPAINTING YOUR PRECIOUS
Now that you have filled in any wear points or patches, it’s time to give the underside of your boat a fresh coat of paint. Do not use spray paint as this is way too thin and will be scuffed off in a single launch.
I recommend you get your hands on something called Poolkote or Flowcoat. This product is available at the majority of resin suppliers, and a quick Goggle search in your area will point you in the right direction. It is a catalyst-cured paint that is perfect for the underside of your hull and is available in a variety of colours. It’s also easy to apply without any specific painting experience.
I’ve heard of people using paint rollers to apply the paint, but when working on the underside of the hull, I’ve found a good quality 50- to 80mm paint brush does the best job.
When applying Poolkote to your hull, good prep is critical. First sand the underside of your vessel and clean it with a spirit cleaner to remove any contaminants. Next, mix a small batch of Poolkote. You will feel it getting warm and, depending on the ambient temperature, you only have a very limited time to apply it before it begins hardening.
Work fast and apply generous amounts with a smooth motion. It is self levelling, so it creates a nice smooth finish and, once hardened, forms a strong and durable finish.
Once your working batch begins to harden, don’t try to squeeze a few more brush strokes out of it because it will begin to clump. Rather mix a fresh batch and carry on where you left off.
My advice for this process is to raise your trailer as high as you safely can above the ground, as you will be working on your back. When you mix your paint, make sure you get your catalyst ratio 100% correct or your paint will not dry – or will dry far too quickly. Your resin supplier can give you the exact details needed for the best mix.
I will be the first to admit that poolcoating the underside of your hull will not give you the same perfect paint finish as when your boat came out the mould with its amazing new gel coat finish, but I’m trying to be pragmatic here.
I can do minor fibreglass repairs and Poolkote the entire underside of my hull for around R1500 including all materials, and when I last saw a quotation for an epoxy-based spray paint of a 19ft hull, this was around R20 000 for just the paintwork. Throw in some fibreglass work, and you are quickly at around R30 000.
Sure, the professional job may well be prettier, and if complex work is needed then it’s best left to professionals, but with a little DIY savvy, you will be amazed at what you can save and how much you can actually do yourself.
Don’t apply Poolkote too high up your gunnels or you will definitely notice the difference between the gel coat and the Poolkote, but if you confine your Poolkote work to the underside of your hull, you’ll hardly even notice it, and I bet everyone will be very impressed with how smart your vessel looks.

A STITCH IN TIME SAVES NINE
My final advice on boat maintenance is this: Don’t leave “little jobs” to accumulate to a point where they add up, become expensive or insurmountable, and, before your eyes, your prized possession crumbles. Take care of the minor details as they come up and you’ll save a fortune and get many more pleasurable hours on the water.
I do hope readers have found value in this three part series. Some of the tips, hints and procedures may seem rather elementary, but we could all do with a little reminder from time to time of the tremendous assets we fish off and how best to make them last.
See you on the water!