SLOWLY DOES IT Part 1
Getting to grips with slow pitch jigging
By Dwayne Boshoff
(Originally published in the January 2025 issue of Ski-Boat magazine)
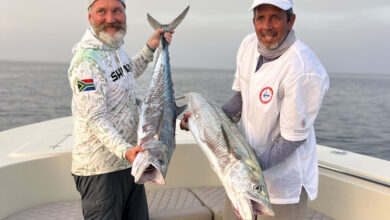
IN the NOVEMBER 2024 issue of SKI-BOAT, Justin Paynter and Mark Brewitt explained the ins and outs of speed jigging. Readers would have noticed some photos there of me with some of the fish I’ve caught on slow pitch jigging – a slightly different technique.
In this article I’ll highlight some of the differences between slow pitch jigging and the old traditional vertical jigging or speed jigging method. I am by no means a pro, but I’ve learnt a lot and paid lots of school fees, so am happy to share some tips I’ve learnt along my slow pitch jigging journey.
Before we get into too much detail, let me emphasise that there’s a lot of useful info in this article, but I don’t want people to get overwhelmed, start overthinking, and not even try this method. The most important thing is to get on the water and start fishing. You can add the finesse to the method later.
In case you’re wondering who I am, I’m a 34-year-old passionate fisherman – some might say a diehard. I’m a tool jig and die maker by trade to financially support my hobby! My dad introduced me to fishing when I was just four years old, and I’m still just as passionate as I was then, and am still learning. I love all the different facets of fishing because each one offers a new experience and a unique thrill, but I have always especially loved light tackle and artificial fishing. When I’m not fishing I enjoy spending time with family and friends and at church.
MY SLOW PITCH JOURNEY
For me, slow pitch jigging first started during the off season in deeper water. During the summer months we used to do a lot of light tackle dropshot fishing in the shallows whilst fishing for ’cuda, but in winter we’re forced to change strategy to target what whatever’s in season. We started fishing the deeper water and I was able to mess around with the lighter gear.
With slow pitch jigs, we could get down a lot faster and to greater depths, than what we could with dropshots. It proved to be very successful.
For the angler, the retrieve or action required with slow pitch jigging is also far less physical than with vertical speed jigging.
WHAT IS A SLOW PITCH JIG?
The first major difference between slow pitch jigging and vertical speed jigging is the design of the lure. Whereas speed jigs are mostly narrow and symmetrical, slow pitch jigs are asymmetrical (not the same shape on both sides), and sometimes they’re
centre-weighted with a keel. This design allows the jig to flutter on the fall while sinking.
The main difference in intent is that slow pitch jigs imitate a wounded or dying baitfish, whereas the old regular speed jigs imitate a fleeing baitfish.
Slow pitch jigs entice feeding when fish are lazy or feeding lethargically, as it’s an easy meal for them. Like predators hunting, fish often single out the weakest link – in this case the supposedly injured baitfish.
Slow jigs flutter, shimmy, dart, bob, spiral, weave, glide, vibrate and quiver, all of which is very effective at drawing the big fish’s attention. Through this erratic movement, slow jigs cover a wider area of water, and the flash tied to the assist hooks adds to the show, pulling an even bigger audience.

JIG SELECTION
According to my research, the rule of thumb for choosing a slow jig is supposed to be 1 gram per metre of water. However, with our conditions, target species, setups and the heavier braid we use, I personally recommend doubling your depth in metres to give you your jig weight in grams. For example, 20m = 40g; 30m = 60g; 100m = 200g.
While it is important to fish your jig as straight down as possible, you also want to go as light as possible on the jig. Let me explain: You will get the best action and flutter out of your jig when your line is pretty straight down and not at a massive angle. This is because the jig will flutter at its optimum, on a fully slack line. When your line goes down at an angle, it causes resistance and drag on the jig, affecting the flutter.
Having your line straight down, will also give you the best bite detection and control in the water column.
Obviously a heavy weight is more likely to drag your jig straight down, so why do I say you should go as light as possible? With a lighter jig the fall is slower, so it hovers in the strike zone for longer, it flutters more, and I generally find the smaller profile to be more effective – essentially it’s the perfect “bite size”. Of course the lighter jigs are also more affordable.
One helpful tip when going down is to thumb the spool slightly, or lightly pinch the braid between your index finger and thumb if you are fishing with a grinder. This allows the jig to sink in a vertical position, rather than fluttering all the way down, and gets it down much quicker.
Although many won’t agree with me, fishing is technical and colours play an important part. Flyfishermen are 100% correct when they say you shoud “match the hatch”. That means getting your artificial lures to look as much like the fish’s natural food as possible.
Generally, I prefer natural colours, and find that’s always a good approach when it comes to fishing with artificials or lures.
That said, Zebra Glow, for some reason, is always a go to! It’s like the signature pattern of slow pitch jigs. I also like pearls, greens and green glow, blues, mackerel, sardine and any other baitfish patterns.

ROD SELECTION
People often ask: Do I really need a slow pitch jigging rod to jig? It boils down to having the right tool for the job. The more serious, good all-round anglers will know, there’s no such thing as an all-round or multipurpose fishing rod – there’s a rod for each application.
What makes each rod different? Rod builders will always focus on the dominant requirement when designing and building a rod. Although most rods are built for pulling power, special applications require specific needs.
For example, paddle-ski rods need to pull at acute angles and past the 90 degree mark; rock and surf rods need to be able to load the rod and cast distance; spinning rods require sensitivity and power transfer.
Slow pitch rods focus on imparting action to the jig. In fact, the rod imparts more of the action than the angler does, and this is what makes this style of angling less labour intensive than vertical jigging.
Slow pitch rods have a fairly slow action, with what I like to call a recoil effect. This slowly lifts the jig and then pitches it; hence the name “slow pitch jigging”.
The pitch is like a flick. This happens when the rod recoils as a result of its slow yet springy action. This allows the jig to kick to the side, moving it into a horizontal position which sets it up to flutter perfectly on the fall due to the jig design. It’s very enticing!
The angler must allow the rod to soak up the tension, then spring back in order to pitch the jig. That flick from the pitch is also like a limping motion of a baitfish on its last legs.
If you want to buy a slow pitch setup, I recommend you look at a PE 1.5-3 to a PE 2-4 rated rod which is generally a medium or a medium-heavy rated rod. That is the most versatile, and is the rod that’s in my hands most of the time.
The corresponding recommended jig weights will suit the depths we generally fish around KwaZulu-Natal. You may be unsure to start with and think it looks the size of your kiddo’s bream rod, but believe me, these small rods are well capable of handling some tough prey.
This facet of angling is fairly new to us here in South Africa, so there may not be a massive variety of slow pitch rods to choose from at your local tackle store, but the market is growing fast. Brands like Okuma, Assassin, Penn and Shimano all have slow pitch rods available locally, and there are also a few new up and coming brands like Noeby and Ecooda that you can look at.
I personally use Assassin rods, and have one of each of their rods in the range, namely the Jig Master, Abyss and Spin Master. They range in price from about R1 600 to R3 900. The Jig Master is the cheapest in the range, but it also happens to be my favourite. The manufacturers have just recently improved it and launched a Jig Master II.
If you just want to get a feel for this whole jigging hype before you throw any money at the project, you can start off with your spinning gear. That’s where I started.
Coming from a spinning background, I like these Assassin slow jig rods because they don’t feel completely foreign in my hands like those fully Japanese specked imported rods. I think the Assassins are perfect for our conditions, target species and size of fish, while still providing all the advantages of slow jig rods.
If you’re fishing on paddle skis and jet skis where packing space is limited, something like the Assassin Duel, which is a spin/jig rod, will do well.
REEL SELECTION
When you select a reel for your slow pitch setup, bear in mind that slow pitch rods are not designed around pulling power. The preferred reels for slow pitch jigging are thus reels that are small and compact, yet powerful. This is to bully the fish, as the rods don’t have the “backbone” to do so.
Remember, the battle is part of the thrill. Get a reel that’s small and compact for comfort, with a combination of speed and torque. The fast retrieve quickly removes slack line, assisting with hookups and complementing the radical action provided by the jig and rod design. Torque is obviously to give you power.
Spinning reels or overhand reels are my personal preference. I use spinning reels on the lighter applications, and overhand on the heavy applications. The overhand reels generally have massive drag ratings and good line capacity.
BRAID AND LEADERS
My recommendation is 30 lb to 50 lb braid. Thin diameter braid is essential to allow you to maintain a vertical presentation with your lighter jigs. Remember what I said – you want to fish your lure as straight down as possible, because it gives you the most action, best bite detection and control.
Always use eight-weave braid. It’s round and smooth and comes off the reel easier. Braid cuts through the water with less resistance, and also offers a much thinner diameter-to-breaking strain than nylon.
Fluorocarbon leader generally makes a difference when fishing with artificial lures. It’s also very hard wearing, meaning abrasion resistant. I recommend using 20 lb to 30 lb heavier than your braid. Make sure you tie nice slim, strong leader knots, as the guides on the rods are generally small to suit the thin blanks.
Multicolour braid also has a big advantage. It allows you control in the water column, identifying where the fish are holding, and how much more line you have to let out to reach the floor in comparison to when you first hit the bottom. I also memorise my last colour to act as an indicator or warning when I’m coming up fast.

TERMINAL TACKLE AND ASSIST HOOKS
Assist hooks are sometimes rigged to both ends of the jig. This gives you a much better hookup rate, and the smaller hooks on the lighter jigs share the load. It also assists with the jig fluttering action – I call it the parachute effect.
The downside is that there’s a greater chance your jig will get tangled with your leader, and you will get hooked up on the reef more often.
If the drift is up or the reef is hungry, it’s advisable to pop the bottom ones off.
Over time I have taken a liking to some more expensive jigs that I don’t want to risk losing to the reef, so now I stick to using one assist hook.
I’ve also paid lots of school fees using standard assist hooks that come fitted on some jigs, and I prefer using my own. I can rely on them not to fail, so I don’t require another hook to share the load.
Some jigs don’t come fitted with assist hooks, but you can buy them made up or tie your own. Adding tinsel or a small skirt for attraction is a good idea.
You can buy proper PE cord for making assists, or a cheaper option is to use that casting leader braid that the rock and surf guys use. It comes in 50m spools and I use 180 lb to 220 lb.
Proper quality hooks and decent split rings will help avoid tears. Vary the hook size according to the size of the jig. I prefer the hook gape to be narrower than the width of the jig, otherwise it tends to get hooked up on the jig.
In the next issue we’ll talk about putting all this tackle to good use. I’ll cover where to use this technique, the species you can target, the conditions that are best suited to it, and the action and retrieve you want to implement.
In the meeantime, just get out there and have fun fishing